Make Your Own Fanciful Flight! Virtual workshops
Workshops now available locally *and* long distance
TBD
Requests? info@karenrossi.com
Family & Friends Online Group Workshop - You pick the Flight & time!
for 3-6 people
for 7-10 people
With this workshop, you can personalize your very own flying character to make a portrait of yourself, a friend, or a creative made-up character -- all from the comfort of your own home.
Materials Needed:
- Paints + paintbrushes
- Charms, beads, and sparkles (some included)
- Wire (included)
- “Flight” body (included)
- Wire cutter or scissors, needlenose pliers
Materials that can be used as charms:
- Buttons and bells
- Broken jewelry
- Shells and sea glass
- Make your own from clay
- Craft store metal and plastic charms
Angel Fanciful Flight

Process
- Plan your design on your “Flight” body by using a pencil or Sharpie marker to draw the outfit and details.
- Use pliers to mold the hair and dress shape
- Use the paints to paint the skin, hair, outfit, and accessories onto your “Flight”
- Details and patterning can be added once the solid layers of paint are dry. Stickers, scrapbooking materials, nail polish, sparkles, and fabric paint are fun ways to add special touches.
- Once you are finished with your flights body, hair, and outfit, it is time to add the charms! Use charms, wire, beads, and any other materials you have collected.
- Be sure to sign your masterpiece!
Fun ways to make your “Flight” unique:
- Use scrapbooking materials and stickers to decorate your Flight’s outfit.
- Include fabric and trim details
- Create a special hanger with wire and beads.
- Use glitter or glitter fabric paint to add sparkly touches
- Sharpie markers + paint pens are helpful to add designs onto the outfit.
- Use paper, fabric, or felt to make shoes and a belt for your “Flight”
- Add beads and wire to the hair for a fancy style
Once you create your own original “Flight,” please send me a picture of your piece to be posted on our website by e-mailing info@karenrossi.com!
Beading (or repairing) charms
We recieved a few requests seeking assistance for repairs...
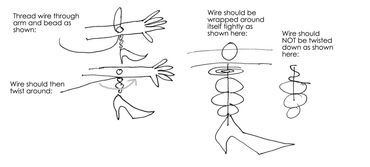
If you have the charm that's fallen off, it's easy to reattach! If not, or if you just want to be creative-- go to any craft store and get a charm. You could even use broken jewelry, or an earring that's missing it's match. You could use a jump ring, or follow the instructions for how to wire them on with a bead below.
The picture here is a charm that Allan in Florida attached to his menorah!

How to re-attach a charm!